
Grand Theft Auto VI is set in Leonida, a fictional sunshine state organised into six named destinations: Vice City, Leonida Keys, Grassrivers, Port Gellhorn, Ambrosia and Mount Kalaga National Park.
The screenshot atlas below groups the published location images under those six names. That distinction matters: a scene can be observed without guessing its road, district or exact position on a fan-made map.
At launch, a printable map of Leonida settled the state outline and road network. We now layer reproducible retail-game routes over that base rather than mixing current discoveries with an old reconstruction.
The interactive map includes a high-value secret route, while the secrets and Easter eggs directory explains what each verified discovery is. A complete 35-Curiosity checklist and a separate unique-weapons guide cover different completion jobs. For an objective-first route rather than a full-map sweep, open the practical tips playbook. Leak-derived material remains excluded.
- Setting
- The state of Leonida (fictional Florida)
- Confirmed regions
- Six
- Primary city
- Vice City
- Official location screenshots
- 42 across the six region groups
- Full official map
- Printable launch map
- WAiNK Curiosities plotted
- 35
- Additional collectibles plotted
- 189
- Illegal operations plotted
- 40
- Safes plotted
- 40
- Focused secret stops
- 23
- Unique weapon sites plotted
- 7
- Era
- Modern day
- Previous Vice City appearance
- GTA: Vice City (2002), set in 1986
Map guide and complete location index
The map uses the launch poster as its base. The 61 hand-audited pins have written final approaches; 269 fixed retail-game markers add collectibles, operations and safes; and 2,260 additional markers complete the released-game atlas with vehicles, stunts, businesses, activities, sports, racing and points of interest.
How the positions are verified
Post-launch positions are registered from in-game markers onto the poster. The hand-audited Curiosity crosswalk has a median residual below one poster pixel; the full-atlas registration uses 270 same-name matches with a median residual of 0.0 poster pixels. Each popup separates gameplay directions from coordinate provenance.
Legacy community map, survey pins and landmark research remain available under “Legacy map views.” Those layers preserve official-footage triangulation by gtamaplib and research credited to map.gtadb.org. Under our leak policy, 72 survey points and 523 landmark entries were excluded.
Featured secret locations
These 11 high-value stops are separated from the dense atlas layers because they come with a complete walkthrough. The poster pin gets you to the correct neighbourhood; the written route gets you to the object or mission marker.
Safehouse · Northern Key Lento, Peach Palm Dr
Jason's House
Jason's Chapter 1 waterfront safehouse and the place to collect five publications before the chapter ends.
At the spot: Leave Sunbelt Hwy on Calypso Ave, turn onto Peach Palm Dr and look for the stilt house with a basketball hoop beside its parking space.
Hand-audited map position
Side quest and Easter egg · McKittrick Farm airstrip, Kelly County
Kyle's 'Red Hulk' Quest
Kyle's giant-strawberry side strand ends with the red mutant encounter that players nicknamed Red Hulk.
At the spot: In Chapter 2, inspect the Pilot Wanted flyer outside the Starlet Motel reception. Follow the KM marker to McKittrick Farm, finish Kyle's first two jobs and wait for his Chapter 3 message before returning.
Hand-audited map position
Puzzle and weapon · Pelican Valley Outpost, western Grassrivers
Pelican Valley Crab Facility
An abandoned crab-research outpost with two code puzzles and the unique Crabshack VF5 SMG.
At the spot: Read CLEAVES as a 0072 keypad clue, then use 0212 at the second lock. Search the final room for the Crabshack VF5.
Hand-audited map position
Unique weapon · Apollo Aggregates, South Vice-Dale County, east of Hamlet and north of Key Lento
Apollo Aggregates Money Glitch
The red warehouse by the highway and three rectangular pools holds contraband, cash, vehicle loot and a safe that can respawn while stash bags remain stored in a personal vehicle.
At the spot: Drive east from Hamlet to Apollo Aggregates. Loot the outside van, interior van and office, store full bags in your personal vehicle, then use the guide's save-reload or drive-away reset. Read the Chapter 1 money-loss warning before farming heavily.
Hand-audited map position
Unique weapon · Marbles Burger, Key Lento, near Jason's house
Marbles Burger Money Glitch
This Key Lento burger shop anchors the reported store-robbery cooldown reset: rob nearby registers, lose the police, then restart and quit a cutscene mission.
At the spot: Rob Marbles and the nearby gas-station store without shooting, lose the wanted level, start an available mission with an opening cutscene, choose Restart Mission and then immediately Quit Mission. Read the linked disclaimer and keep a separate save.
Hand-audited map position
Unique weapon · Derelict Spy Vessel, southeastern Permit Keys
Assassin Nipper .38
A suppressed unique pistol hidden in the deck compartment of the Derelict Spy Vessel.
At the spot: Land at the southern tip of the southeastern Permit Keys island, scan the wreck with WAiNK, climb aboard and open the deck slat beside the Old Note.
Hand-audited map position
Unique weapon · Northernmost Permit Keys island, north shore
Smuggler Gorse 425
A free unique close-range shotgun beside a small tilted smuggler's boat.
At the spot: Reach the northernmost Permit Keys island and follow its north shore to the small wooden wreck where the mangroves meet the water. The shotgun is on the ground beside the tilted hull.
Hand-audited map position
Unique weapon · Fishing Shacks, middle Wetman Bay island
Kingfishers W-22
A unique suppressed rifle with an optic inside the lit shack at the high-security Fishing Shacks.
At the spot: Approach the Wetman Bay shacks prepared for resistance, enter the lit building and search the interior weapon position.
Hand-audited map position
Unique weapon · Manatee Motel, Cottonmouth Lake
Kingfishers Laird 350
A unique sniper rifle hidden in a motel room near Cottonmouth Lake from Chapter 2 onward.
At the spot: Enter the room left of the SPEED LIVE graffiti and check the back-right corner. Expect guards, a loose dog and possibly a tiger.
Hand-audited map position
Side quest and Easter egg · Dead-end road across Gambit Bay from northern Key Lento
Skunk Ape Sighting
The first Mr. Mangrove sighting leads to a tree effigy and unlocks the trail into Kirk's Skunk Ape quest.
At the spot: Take Jason's boat across Gambit Bay, land by the dead-end road on the inside of the peninsula and use Focus when the sound prompt appears. Chase the creature into the mangroves and inspect the effigy.
Hand-audited map position
Side quest and Easter egg · Road northwest of Starlet Motel, Kelly County
Starlet Motel UFO Encounter
A night-only roadside event leads into the woods, an alien encounter and The Truth Is Out There trophy or achievement.
At the spot: Travel alone after 2:00 AM, watch for a parked car with blinking lights on the road northwest of Starlet Motel, then follow the path into the trees. Leave and return if the car does not spawn.
Hand-audited map position
Side quest and Easter egg · Bluegrass Antenna Mast, South Vice-Dale County, north of Hamlet
Literal Easter-Egg Nest
A nest of painted eggs sits on the highest platform; throwing one from the tower triggers a hidden scene.
At the spot: Fence-hop at the red-and-white Bluegrass antenna mast, climb to the highest platform, pick up one painted egg and throw it over the edge. Save before the long climb.
Hand-audited map position
Side quest and Easter egg · Orchard Avenue, southern Port Gellhorn, northwest of Dirt Merchants
Genuine Cowboy Hat (Arthur Morgan Reference)
A yard sale sells a $5 Genuine Cowboy Hat that closely resembles Arthur Morgan's Red Dead Redemption 2 hat.
At the spot: In Chapter 2 or later, follow the Yard Sale signs northwest of Dirt Merchants. Find the balloons and American flag; the hat rests on a guitar case by the couch.
Hand-audited map position
Side quest and Easter egg · Belville, Leonard County
Belville Simulation House
The garage contains a wall-sized board left by a resident who has realised Leonida behaves like a video game.
At the spot: Visit during the day and look for the detached house with a white picket fence and two tall palms. Break into the garage and inspect the full board, desk and boat brochures.
Hand-audited map position
Side quest and Easter egg · Northern Washington Island, above Washington Beach
Trinity Apartments (Dexter)
A waterfront condo recreates Dexter Morgan's television apartment, with additional references on the roof and dock.
At the spot: On northern Washington Island, go between the Pay 'N' Spray and Vice Beach Top Fun Drones icons. Identify the waterfront complex, use the outdoor corridor and continue to the roof for the prop references.
Hand-audited map position
Vehicle location · Central Vespucci Island, Rialto Causeway
Paul Walker Penumbra FF Garage
A villa garage hides the green Maibatsu '97 Penumbra FF styled after Brian O'Conner's 1995 Mitsubishi Eclipse.
At the spot: On Vespucci Island, find the hedge-screened white villa across from a house under construction. Enter by the garage side door, disable the alarm and register the green Penumbra after stealing it.
Hand-audited map position
Vehicle location · Central Casanova Island, Rialto Causeway
Casanova Gold Lamborghini Urus
The central mansion garage contains a gold Lamborghini Urus with the CASHTLKS plate and collectible cards nearby.
At the spot: Drive to the large gated mansion near the middle of Casanova Island, cross the driveway gate and break into the garage. Check the shelves before leaving with the Urus.
Hand-audited map position
Vehicle location · La Perle Trap House, off NW 10th Ave
La Perle Charred Toros
A gold Pegassi Charred Toros sits in the fenced front yard with two guards; its released-game scan lists no tracker and an $8,950 registration fee.
At the spot: Approach from behind the trap house, climb the outer fence and then the next fence, crouch and move up behind the SUV. Make the final run to the driver door only when you are close enough to leave before the two guards react.
Hand-audited map position
Vehicle location · Chatfield Storage & Logistics, western Waxman Island
Chatfield Purple Drank Emerus
The tracker-free Progen Purple Drank Emerus is inside a waterside shipping container at the guarded Chatfield Storage yard; the office safe code is 5800.
At the spot: Approach north from the Waxman Island Pay 'N' Spray, read 5800 from the laptop by the red container, loot the upstairs office, press the gate button outside the security cabin and take the purple car from the open waterside container.
Hand-audited map position
Unique weapon · Palmer Fishing Warehouse, southeast Bobcat Key by Watson Bay
Palmer Fishing Golden KZ-59
The gold La Polilla Negra KZ-59 is in the upstairs case beside the safe at this high-security cocaine warehouse; the safe code is 1886.
At the spot: Use the opening along the right-side fence, collect the suppressed FF-SR by the crates, read code 1886 from the ground-floor computer and take the golden KZ-59 from the upstairs case. Escape in the boat moored behind the warehouse.
Hand-audited map position
Vehicle location · Hog Stars Garage, Acacia St, Ambrosia
Hog Stars Devil's Rope Gauntlet
This high-security Final Chapter garage holds the wrapped Bravado Devil's Rope Gauntlet, unique Shortstraw shotgun, drugs, cash and a separate office safe.
At the spot: Climb the ladder on the building's southwest side, enter through the open roof hatch, clear the bikers and guard dog, collect the Shortstraw below the framed vest and open the vehicle exit before taking the Gauntlet from the garage bay.
Hand-audited map position
Vehicle location · Vespucci Mansion, Neptune Circle
Royal Ruby Emerus
A red Progen Royal Ruby Emerus sits behind the wall of the guarded mansion next to the Paul Walker car property.
At the spot: Enter Vespucci Mansion over the side wall, avoid or clear the armed guards and check the small garage or driveway area near the entrance before taking the car.
Hand-audited map position
Vehicle location · Crimson Palms Condominiums, Washington Beach
Crimson Palms Gold Lamborghini
A metallic gold Lamborghini is parked under cover on Crimson Palms Condominiums' upper parking deck.
At the spot: Find the red-lit beachfront tower in Washington Beach, take the curved vehicle ramp on the building's right and check beside the upper entrance.
Hand-audited map position
Vehicle location · Northeast Starfish Island, by Waxman Island
Starfish Island Mansion Garage
The guarded waterfront mansion can hold a Vitello, Itali RSX, Dubsta, Big Cat Furia and a reported purple sport bike.
At the spot: Follow Starfish Island's road to the northeast turnaround and use the driveway with the small oval loop. Scan every garage bay and the front courtyard because the lineup can vary.
Hand-audited map position
Vehicle location · Mile Zero Air Station, Goose Key
Mile Zero Air Station Fighter Jet
Mile Zero is Leonida's military base, with stealable Hauners P996-Lazer fighter jets parked beside the northern hangars.
At the spot: Follow Route 1A west through Abismo Key and Southwind to Goose Key. Enter at the southeast checkpoint or use the nearby dirt-mound stunt jump, then drive north along the runway to the jet parking beside the hangars. Expect immediate armed resistance and a severe wanted response.
Hand-audited map position
Vehicle location · Vice City International Airport terminal and car park
VCIA Bottcher 020 Airliner
Reach the VCIA terminal roofs from the fifth floor of the car park, cross to the passenger tunnel and board the double-decker Bottcher 020 before taxiing to a long runway.
At the spot: Use the terminal car park to reach the fifth floor, drop onto the passenger-tunnel roof and cross the connected rooftops to the Bottcher 020 gate. Enter through the tunnel, take the cockpit, reverse clear of the terminal and taxi to a long runway. Forcing a security gate can trigger an immediate four-star wanted level.
Hand-audited map position
Vehicle location · Big Pine, southern North Mariana County
Hauners Ridgway IAA Black Site
The underground IAA Black Site hangar holds the Hauners Ridgway mini tank and Cold War 556 at the end of the President's Bunker clue trail.
At the spot: Finish José Bermúdez's Little Cuba trail, then find the hatch south of Ammu-Nation at Big Pine. Enter 085355, restore power, crouch into the control room and press the hangar button.
Hand-audited map position
All 35 WAiNK CuriositiesCrawlable checklistOpen full directions
- Assassin Nipper .38 (Derelict Spy Vessel, southeastern Permit Keys)
Land at the southern tip of the southeastern Permit Keys island, scan the wreck with WAiNK, climb aboard and open the deck slat beside the Old Note. - Hovercraft Crash (Sandbars, north side of the southern island)
Reach the southern Sandbars island, follow its north shore and scan the grounded hovercraft. - Wreck of the Meerwunder (Central Featherstone Islands)
Use a boat among the small central Featherstone Islands and scan the exposed wreckage. - Anti Sugar Residence (Construction area, west Ambrosia)
Enter the construction area on Ambrosia's west side and scan the conspicuously signed property frontage. - Camp Moonflower (Emerald Springs Dr)
Leave Emerald Springs Dr for the camp clearing and scan its central site. - Dead Sharks (Wetman Bay, shore of the long island)
Land on the long Wetman Bay island and scan the group of shark carcasses along its shore. - Fossilized Prints (Valley below the bridge, southwest Moreau)
Descend into the valley below the bridge southwest of Moreau and scan the impressions in the exposed rock. - Beach Party Site (Permit Keys, east coast of the middle island)
Land beside the dock on the middle Permit Keys island's east coast and scan the party debris above the waterline. - Fairy Lane (Southwest Lummox County)
Follow the small forest trail in southwest Lummox County and scan the decorated lane. - Mermaid Display (Catalan Key Oceanarium docks warehouse)
Go to the docks warehouse at Catalan Key Oceanarium and scan the mermaid display. - Imperial Spanish Ruins (Western Mount Kalaga)
Approach through western Mount Kalaga and scan the main stone remains. - Intriguing Substance (Southern East Lummox County)
Search the southern East Lummox backroads and scan the unusual material in the clearing. - Halloween House (Central Capri)
Find the decorated house in central Capri and scan its front display. - Christmas House (Central Key Lento)
Stop at the heavily decorated house in central Key Lento and scan its front display. - Dino Golf (Southern Frogswater)
Pull into the roadside attraction in southern Frogswater and scan the oversized dinosaur. - NoFlusher Homestead (Wetman Bay Y-shaped island)
Land on Wetman Bay's Y-shaped island and scan the main homestead structure. - Deserted Home (Southwest Emerald Springs)
Reach the isolated property southwest of Emerald Springs and scan the abandoned house exterior. - Lovers Lookout (Southwest Mount Kalaga)
Climb the southwest Mount Kalaga road and scan the lookout furniture or sign. - Pet Cemetery (Southern Grayson, near SR-73)
Leave SR-73 in southern Grayson and scan the small grave markers beneath the trees. - Desert Island Piano (Far-western Shoeless Keys island)
Use a boat to reach the tiny island at the far west of Shoeless Keys and scan the piano on dry ground. - Promotional Sand Vehicles (Ocean Beach, eastern beach)
Walk the eastern Ocean Beach shoreline and scan the vehicle-shaped sand sculptures. - Belville Topiary (Harmony Dr, southern Belville)
Find the landscaped property on Harmony Dr in southern Belville and scan the shaped hedge. - Abismo Key Carcass (Abismo Key, southern shore)
Boat to Abismo Key's southern shore and scan the carcass at the waterline. - Wetman Bay Carcass (Wetman Bay, south shore of the central island)
Land on the central Wetman Bay island's south shore and scan the remains on the mud or sand. - Goose Key Carcass (Mile Zero Air Station, northern shore)
Follow the northern shore by Mile Zero Air Station and scan the beached remains. - C0-B8 Engine (Moreau mountains, near the gold mine)
Near the Moreau gold mine, scan the engine separately from the debris and fairing. - C0-B8 Debris (Small Featherstone island)
Boat to the small Featherstone island and scan the main debris group. - C0-B8 Fairing (West coast of the large eastern Featherstone island)
Land on the west coast of the large eastern Featherstone island and scan the fairing separately. - Big Entrance (Dalton Island)
Go to Dalton Island and scan the oversized entrance structure. - Fingerpost (Large central Permit Keys island)
Land near the middle of the large central Permit Keys island and scan the many-armed signpost. - Spaceship House (Maple Ln and Cedar St, western Ambrosia)
At Maple Ln and Cedar St in western Ambrosia, scan the spacecraft-like house from its yard. - Vibrant Pond (Southernmost Gullet Marsh island)
Land on Gullet Marsh's southernmost island and scan the vivid pond from its open bank. - Unidentified Animal Pen (UAP) (Kingston Rd, northern Watson Bay)
Find the fenced compound off Kingston Rd in northern Watson Bay and scan the pen from outside. - Selkie Hole (Western Emerald Springs)
Approach the waterhole in western Emerald Springs and scan it from firm ground. - Plunge Masters Deep Sea Chalet (Southern Key Lento Dive Center mural)
At the Dive Center mural in southern Key Lento, use scuba gear, descend and scan the submerged structure.
All 2,260 full-atlas additionsVehicles, stunts, services, activities and POIs
- Activities (81 locations)
- Collectibles (3 locations)
- Food Drink (301 locations)
- Points Of Interest (231 locations)
- Racing (95 locations)
- Robberies (308 locations)
- Sports (122 locations)
- Stunts (397 locations)
- Style (128 locations)
- Vehicles (593 locations)
Search any marker by name above, or open “Full atlas layers” to display an entire category. Routine layers start hidden to keep the map readable.
All 269 additional verified discoveriesCollectibles, operations and safes
- 11:59 1 (Fairyland Forest · Magazine)
- 11:59 2 (Peacock Bay · Magazine)
- Amber - Standard (Belville · Card)
- Amie - Deep Red (Emerald Springs · Card)
- Amie - Pink (Key Lento · Card)
- Amie - Purple (Capri · Card)
- Body Copy 1 (Key Lento · Magazine)
- Body Copy 2 (Little Cuba · Magazine)
- Body Copy 3 (Washington Beach · Magazine)
- Book Swap 1 (Watson Bay · Book Swap)
- Book Swap 2 (Key Lento · Book Swap)
- Book Swap 3 (Peacock Bay · Book Swap)
- Book Swap 4 (Waning Sands · Book Swap)
- Book Swap 5 (Ambrosia · Book Swap)
- Book Swap 6 (Rialto Islands · Book Swap)
- Book Swap 7 (Capri · Book Swap)
- Braelynn - Deep Red (Mount Kalaga · Card)
- Braelynn - Pink (Card · Card)
- Braelynn - Purple (St · Card)
- Brianna Blue - Deep Red (Grassrivers · Card)
- Brianna Blue - Pink (Redhill · Card)
- Brianna Blue - Purple (Capri · Card)
- Chip - Standard (Watson Bay · Card)
- Chrissie - Deep Red (Redhill · Card)
- Chrissie - Pink (Port Gellhorn · Card)
- Chrissie - Purple (Card · Card)
- Christel - Deep Red (Bohemia · Card)
- Christel - Pink (Little Cuba · Card)
- Christel - Purple (Ocean Beach · Card)
- Clarissa - Bronze (Little Cuba · Card)
- Clarissa - Gold (Goliath · Card)
- Clarissa - Silver (Capri · Card)
- Cleo - Standard (Fairyland Forest · Card)
- Compliance Theater (Tequesta Retreat · Mural)
- Crystal - Standard (Shoreline · Card)
- Cyrus - Standard (Little Cuba · Card)
- Daisy - Standard (Bohemia · Card)
- Drive Shaft 1 (Draper Island · Magazine)
- Drive Shaft 2 (Rialto Islands · Magazine)
- Drive Shaft 3 (Little Cuba · Magazine)
- Endowed 1 (Rialto Islands · Magazine)
- Endowed 2 (Waning Sands · Magazine)
- Endowed 3 (Bohemia · Magazine)
- Extraction Service (Shoreline · Mural)
- Foiled 1 (Grassrivers · Magazine)
- Foiled 2 (Belville · Magazine)
- Georgia - Deep Red (St · Card)
- Georgia - Pink (Little Cuba · Card)
- Georgia - Purple (Key Lento · Card)
- Harley - Standard (Port Gellhorn · Card)
- High Rollerz 1 (Port Vice City · Magazine)
- High Rollerz 2 (Tequesta Retreat · Magazine)
- High Rollerz 3 (Bohemia · Magazine)
- Jada Watts - Bronze (Port Gellhorn · Card)
- Jada Watts - Gold (Lollipop Ridge · Card)
- Jada Watts - Silver (Watson Bay · Card)
- Jason - Standard (Port Gellhorn · Card)
- Jemila - Deep Red (Little Cuba · Card)
- Jemila - Pink (Peacock Bay · Card)
- Jemila - Purple (Vice Beach · Card)
- Jesenia - Bronze (Belville · Card)
- Jesenia - Gold (Rialto Islands · Card)
- Jesenia - Silver (Leonida Keys · Card)
- Julia - Bronze (Port Gellhorn · Card)
- Julia - Gold (Ocean Beach · Card)
- Julia - Silver (Peacock Bay · Card)
- Kadisha - Deep Red (Goliath · Card)
- Kadisha - Pink (Little Cuba · Card)
- Kadisha - Purple (Lollipop Ridge · Card)
- Kandi - Standard (Little Cuba · Card)
- Kelly - Deep Red (Port Gellhorn · Card)
- Kelly - Pink (Belville · Card)
- Kelly - Purple (Tequesta Retreat · Card)
- Lance - Standard (Dalton Island · Card)
- Lavinia - Deep Red (Draper Island · Card)
- Lavinia - Pink (St · Card)
- Lavinia - Purple (Redhill · Card)
- Lenora - Deep Red (Tequesta Retreat · Card)
- Lenora - Pink (Little Cuba · Card)
- Lenora - Purple (Little Cuba · Card)
- Lexi Campbell - Bronze (Fairyland Forest · Card)
- Lexi Campbell - Gold (Port Gellhorn · Card)
- Lexi Campbell - Silver (Buckskin · Card)
- Loophole Architecture (Little Cuba · Mural)
- Louise - Bronze (Little Cuba · Card)
- Louise - Gold (Little Cuba · Card)
- Louise - Silver (Lake Leonida · Card)
- Lucky - Standard (Bohemia · Card)
- Malena - Deep Red (Belville · Card)
- Malena - Pink (Fairyland Forest · Card)
- Malena - Purple (Emerald Springs · Card)
- Manly Gaze (Magazine · Magazine)
- Mario - Standard (Peacock Bay · Card)
- Meghan - Bronze (Bohemia · Card)
- Meghan - Gold (Buckskin · Card)
- Meghan - Silver (Osborn Reef · Card)
- MonaLi$a - Bronze (Buckskin · Card)
- MonaLi$a - Gold (Leonida Keys · Card)
- MonaLi$a - Silver (Alligator Point · Card)
- Nevaeh - Standard (Redhill · Card)
- Nicole - Standard (Hamlet · Card)
- Off the Hook 1 (Key Lento · Magazine)
- Off the Hook 2 (Key Lento · Magazine)
- Off the Hook 3 (Port Gellhorn · Magazine)
- Perla - Standard (Card · Card)
- Pricilla Pace - Bronze (Fairyland Forest · Card)
- Pricilla Pace - Gold (Capri · Card)
- Pricilla Pace - Silver (Card · Card)
- Privatized Pains Socialized Gains (Washington Beach · Mural)
- Pêche 1 (Peacock Bay · Magazine)
- Pêche 2 (Key Lento · Magazine)
- Pêche 3 (Buckskin · Magazine)
- Serena - Bronze (Fairyland Forest · Card)
- Serena - Gold (Peacock Bay · Card)
- Serena - Silver (Card · Card)
- The Sniper of La Perle 1 (Bohemia · Playlist)
- The Sniper of La Perle 2 (Bohemia · Playlist)
- The Sniper of La Perle 3 (Bohemia · Playlist)
- The Sniper of La Perle 4 (Bohemia · Playlist)
- The Vault Radio 1 (Little Cuba · Playlist)
- The Vault Radio 2 (Little Cuba · Playlist)
- The Vault Radio 3 (Little Cuba · Playlist)
- Thelma - Standard (Key Lento · Card)
- Tracy - Standard (Little Cuba · Card)
- Trigger Happy 1 (St · Magazine)
- Trigger Happy 2 (Key Lento · Magazine)
- Trigger Happy 3 (Port Gellhorn · Magazine)
- Vanessa - Bronze (Fairyland Forest · Card)
- Vanessa - Gold (Bohemia · Card)
- Vanessa - Silver (Peacock Bay · Card)
- Vicki - Standard (Peacock Bay · Card)
- You Signed the Terms & Conditions (Shoreline · Mural)
- Zaria RI RI Luckett - Bronze (Little Cuba · Card)
- Zaria RI RI Luckett - Gold (Peanut Island · Card)
- Zaria RI RI Luckett - Silver (Port Gellhorn · Card)
- ¡Bombazo! 1 (Little Cuba · Magazine)
- ¡Bombazo! 2 (Hamlet · Magazine)
- ¡Bombazo! 3 (Bohemia · Magazine)
- Aqua Stadium (Gloriana Key · WAiNK Landmark)
- Badger R&D Tower (Key Lento · WAiNK Landmark)
- Belpoint Lighthouse (Capri · WAiNK Landmark)
- Bobcat Key Experimental Home (WAiNK Landmark · WAiNK Landmark)
- Bonanza Giant (Redhill · WAiNK Landmark)
- Courtland Park Stadium (Tequesta Retreat · WAiNK Landmark)
- Derelict Spy Vessel (Leonida Keys · WAiNK Landmark)
- Dock Ring (Shoreline · WAiNK Landmark)
- Downtown Periscope (Shoreline · WAiNK Landmark)
- Farmer Scrumpy's Apple Orchard (WAiNK Landmark · WAiNK Landmark)
- Gellhorn Fun Fair (Port Gellhorn · WAiNK Landmark)
- Grayson Cairns (Mount Kalaga · WAiNK Landmark)
- Hoffman Observatory (Mount Kalaga · WAiNK Landmark)
- Howe Dairy Farm's Big Udder (Lollipop Ridge · WAiNK Landmark)
- IAA's Friends of Freedom (Shoreline · WAiNK Landmark)
- Kalaga Lookout (Mount Kalaga · WAiNK Landmark)
- Lawton Co. Paper Mill (Redhill · WAiNK Landmark)
- Old Goliath (Ambrosia · WAiNK Landmark)
- Outlaw's Cabin (Redhill · WAiNK Landmark)
- Pelican valley Observation Tower (Hamlet · WAiNK Landmark)
- Riquezas Keys Radome (WAiNK Landmark · WAiNK Landmark)
- Sky Ride (Lollipop Ridge · WAiNK Landmark)
- St. Lucia Lighthouse (Peanut Island · WAiNK Landmark)
- Tallaloko Amphitheater (Fairyland Forest · WAiNK Landmark)
- Thicc Herbie (Leonida Keys · WAiNK Landmark)
- Tucker's Citrus Farms Water Tower (Lollipop Ridge · WAiNK Landmark)
- Unidentified Building (Peanut Island · WAiNK Landmark)
- Wild Hog Point Radar Base (Port Gellhorn · WAiNK Landmark)
- Blanco Memorial (Rialto Islands · WAiNK Sculpture)
- Buckskin Swamp Totem (Buckskin · WAiNK Sculpture)
- Catalan Blvd Garden (Bohemia · WAiNK Sculpture)
- Chariot to Valhalla (Redhill · WAiNK Sculpture)
- Colossus (Peacock Bay · WAiNK Sculpture)
- Fatal Incursion Plaque (Leonida Keys · WAiNK Sculpture)
- Flam Gummies (Watson Island · WAiNK Sculpture)
- Gimme All Your Oil (Bohemia · WAiNK Sculpture)
- Grassrivers Visitor Center Status (Alligator Creek · WAiNK Sculpture)
- Junkyard T-Rex (Fairyland Forest · WAiNK Sculpture)
- Large Lure (Ocean Beach · WAiNK Sculpture)
- Leonida Snow (Shoreline · WAiNK Sculpture)
- Monument of Leonida (Port Gellhorn · WAiNK Sculpture)
- Monument of Leonidan Supremacy (WAiNK Sculpture · WAiNK Sculpture)
- Mother Rushwood (St · WAiNK Sculpture)
- Neptune Rises (Bay Harbor · WAiNK Sculpture)
- Pixel Fountain (Tequesta Retreat · WAiNK Sculpture)
- Princess Robot Bubblegum Statue (Washington Beach · WAiNK Sculpture)
- The Grand Turkey of Capri (Capri · WAiNK Sculpture)
- The Wonder Whale (Key Lento · WAiNK Sculpture)
- Thrillbilly Mascot (Bridge Ridge · WAiNK Sculpture)
- Triangler Sculpture (Peregrine Bay · WAiNK Sculpture)
- Vice Museum of Art Sculpture (Washington Beach · WAiNK Sculpture)
- Armory Safe - Vespucci Mansion (Rialto Islands · Safe)
- Armory Safe 2 - Vespucci Mansion (Rialto Islands · Safe)
- Dock Warehouse Safe - Sunset RV Park (Alligator Creek · Safe)
- Garage Safe - Nova Auto Junkyard (Hamlet · Safe)
- Lieutenant Room Safe - La Cascara Motel (Port Gellhorn · Safe)
- Locked Safe - Backroom Weed Front (Port Gellhorn · Safe)
- Locked Safe - Carter Mining Boathouse (Redhill · Safe)
- Locked Safe - Mill Station Radar Base (Watson Bay · Safe)
- Locked Safe - Walker Farm (Lollipop Ridge · Safe)
- Office Safe - Brooks Boatworks (Port Gellhorn · Safe)
- Office Safe - Chatfield Storage & Logistics (Watson Island · Safe)
- Office Safe - Hog Stars Garage (Ambrosia · Safe)
- Office Safe - Kingpin Bowling (Port Gellhorn · Safe)
- Office Safe - Saber Shipping Facility (Little Cuba · Safe)
- Office Safe - Sunrise RV Park (Alligator Creek · Safe)
- RV Safe - Weed Grow (St · Safe)
- Safe (Lollipop Ridge · Safe)
- Safe - Biker Hideout (Lake Leonida · Safe)
- Safe - Casa Guardia (Little Cuba · Safe)
- Safe - Cigar Import Front (Little Cuba · Safe)
- Safe - Exotic Animal Front (Key Lento · Safe)
- Safe - Farm Fix Meth Lab (Waning Sands · Safe)
- Safe - Illegal Goods Store (Peacock Bay · Safe)
- Safe - Illegal Sneaker Trade (Bohemia · Safe)
- Safe - Industrial Weed Grow (Goliath · Safe)
- Safe - Irons Building Supply (Ambrosia · Safe)
- Safe - June Warehouse (Port Gellhorn · Safe)
- Safe - Leonida Carrier Warehouse (Little Cuba · Safe)
- Safe - Manatee Motel (Alligator Creek · Safe)
- Safe - Ocean Beach Lab (Ocean Beach · Safe)
- Safe - Palmer Fishing Warehouse (Watson Bay · Safe)
- Safe - Parlor Apartments (Little Cuba · Safe)
- Safe - Saber Shipping Facility (Little Cuba · Safe)
- Safe - Slator Towing Inc (Peacock Bay · Safe)
- Safe - Sound4Sound Studio (Bohemia · Safe)
- Safe - Stash House (Port Gellhorn · Safe)
- Safe - Watson Bay Safe House (Watson Bay · Safe)
- Safe - Weed Grow (St · Safe)
- Safe -Janjak's Garage (Little Cuba · Safe)
- Warehouse Safe - Brooks Boatworks (Port Gellhorn · Safe)
- Backroom Weed Front (Port Gellhorn · Gang Hideout)
- Biker Hideout (Lake Leonida · Gang Hideout)
- Brooks Boatworks (Port Gellhorn · Gang Hideout)
- Carter Mining Boathouse (Redhill · Gang Hideout)
- Casa Guardia (Little Cuba · Gang Hideout)
- Chatfield Storage & Logistics (Watson Island · Gang Hideout)
- Cigar Import Front (Little Cuba · Gang Hideout)
- Exotic Animals Front (Key Lento · Gang Hideout)
- Fam Fix Meth Lab (Belville · Gang Hideout)
- Fishing Shacks (Grassrivers · Gang Hideout)
- Gas Station Meth Front (Lollipop Ridge · Gang Hideout)
- Hog Stars Garage (Ambrosia · Gang Hideout)
- Illegal Goods Store (Peacock Bay · Gang Hideout)
- Illegal Sneaker Trade (Bohemia · Gang Hideout)
- Industrial Weed Grow (Goliath · Gang Hideout)
- Irons Building Supply (Ambrosia · Gang Hideout)
- Janjak's Garage (Little Cuba · Gang Hideout)
- June Warehouse (Port Gellhorn · Gang Hideout)
- Kamar Devon Community Center (Peacock Bay · Gang Hideout)
- Kingpin Bowling (Port Gellhorn · Gang Hideout)
- La Cascara Motel (Port Gellhorn · Gang Hideout)
- La Perle Trap House (Bohemia · Gang Hideout)
- Leonida Carrier Warehouse (Little Cuba · Gang Hideout)
- Manatee Hotel (Alligator Creek · Gang Hideout)
- Mill Station Radar Base (Watson Bay · Gang Hideout)
- Nova Auto Junkyard (Hamlet · Gang Hideout)
- Ocean Beach Lab (Ocean Beach · Gang Hideout)
- Palmer Fishing Warehouse (Watson Bay · Gang Hideout)
- Parlor Apartments (Little Cuba · Gang Hideout)
- Saber Shipping Facility (Little Cuba · Gang Hideout)
- Saber Shipping Yard (Little Cuba · Gang Hideout)
- Slator Towing Inc (Peacock Bay · Gang Hideout)
- Sound4Sound Studio (Bohemia · Gang Hideout)
- Southside Trap House (Peacock Bay · Gang Hideout)
- Stash House (Port Gellhorn · Gang Hideout)
- Sunrise RV Park (Alligator Creek · Gang Hideout)
- Vespucci Mansion (Rialto Islands · Gang Hideout)
- Walker Farm (Lollipop Ridge · Gang Hideout)
- Watson Bay Safehouse (Watson Bay · Gang Hideout)
- Weed Grow (St · Gang Hideout)
Community pins
Registered members can suggest places for the legacy community coordinate layer. A suggestion must state its basis, such as an official asset or reproducible retail-game capture, and a moderator reviews it before it appears. Approved pins render in white with the member credited.
Log in to suggest a place for the community layer. Suggestions state their source and are reviewed by a moderator before they appear. You can also discuss the map with other members below.
Pre-launch triangulated places, by region
The legacy survey layer's 374 places as plain text. Counts are places, not survey points: the source dataset holds 1245 raw survey fixes, collapsed here to one entry per named place.
Vice City 129 places Vice City Region guide
- 100 Biscayne Blvd
- 1000 Venetian Way
- 1111 Lincoln Rd
- 123 NE 36th St
- 12th St Lifeguard Tower
- 1500 Ocean Dr
- 1500 Ocean Dr (S)
- 50 Biscayne Blvd
- Akoya Condominium
- Art Deco Welcome Center
- Asia Brickell Key
- Ball near Grassrivers Sign
- Bank of America Financial Center
- Beach
- Biscayne Island
- Blue Diamond
- Brown Hotel Sign
- CC (3)
- CC (9)
- Canal (Hotel Valetta)
- Capri South Beach
- Carbonell Brickell
- Citigroup Center
- Construction Crane (Vice Beach)
- Container Crane
- Continuum on South Beach
- Cruise Ship
- Cruise Terminal D
- Cruise Terminal G
- Di Lido Island
- East Venetian Causeway Bridge
- FAA Miami ATCT
- Fisher Island
- Flagler Memorial Island
- Flagler on the River
- Flamingo South Beach
- Golf Course
- Grass (MIA)
- Green Diamond
- Helipad 1
- Helipad 2
- Helipad Path
- Highway Sign (404)
- Hotel Breakwater
- Hotel Victor
- Icon at South Beach
- InterContinental Miami
- Jade Ocean Condos
- Jenny Hostel
- KC01
- KC02
- KC03
- KC04
- KC06
- KC07
- KC08
- KC09
- KC10
- KC11
- Kaseya Center
- Lake
- Lake near VCIA
- Latitude on the River (S)
- Loews Miami Beach
- Loft Downtown II
- MIA North Terminal Tower
- MacArthur Causeway
- Marina Blue
- Marker (MIA)
- Marriott Miami Biscayne Bay
- Miami Beach Parking Garage
- Miami Tower
- Miami-Dade County Courthouse
- Murano Grande
- New World Center
- Nine at Mary Brickell Village
- North Vice City Bridge
- North Vice City Coast
- North-South Highway
- Old City Hall
- One Miami Condominium East
- One Miami Condominium West
- Opera Tower
- Palazzo del Sol
- Park
- Pelican Harbor Marina
- Pelican Harbor Radio Tower
- Picnic Island A
- Picnic Island B
- Picnic Island C
- Picnic Island D
- Pier (Flamingo)
- Pole near Signature Hangar 2
- Port
- Portofino Tower
- Reworld Miami-Dade
- Rivo Alto Island
- Road (MIA)
- Round Water Tower
- Royal Palm South Beach
- Royal Palm South Beach (N)
- Sherry Frontenac Oceanfront Hotel
- Signature Hangar 2
- Skyviews Miami Observation Wheel
- Southeast Financial Center
- St. Moritz Hotel
- Stack
- Star Island Bridge
- Star Island Water Tower
- Stephen P. Clark Government Center
- Sunset Harbour South Condo
- Ten Museum Park
- The Floridian
- The Gates Hotel South Beach
- The Grand
- The Ritz-Carlton Bal Harbour
- The Tides South Beach
- The Waverly South Beach
- Three Tequesta Point
- Trésor Tower
- Unknown Object
- Unknown Sphere
- Venetian Isle Condominium
- Vice City Sign
- Vice River
- Vizcayne North Condominium
- Vizcayne South Condominium
- W South Beach
- Wells Fargo Center
Leonida Keys 83 places Leonida Keys Region guide
- 102180 Overseas Hwy
- 104000 Overseas Hwy
- 105 Front St
- 118 Poinsetta Dr
- 180 Pompano Dr
- 200 Pompano Dr
- 500 Pompano Dr
- 99353 Overseas Hwy
- Anchor Island
- Blimp
- Blimp Bay
- Blimp Inlet
- Blimp Key
- Blimp Road
- Blue Billboard (Key Lento)
- Bridge Island
- Broken Keys Bridge
- East Key
- Grassrivers River Mouth
- House C
- House D
- House with Pier
- Island A
- Island B
- Island C
- Island D
- Island E
- Island G
- Island H
- Island I
- Island J
- Island K
- Island N
- Island S
- Island U
- Island V
- Island W
- Island X
- Island Y
- Island Z
- Jason's House (Basketball Hoop)
- Jason's House (Boat Ramp)
- Jason's House (Front Stairs)
- Jason's House (Garden Table)
- Jason's House (Main)
- Jason's House (North Veranda)
- Jason's House (Pillar 1)
- Jason's House (Pillar 10)
- Jason's House (Pillar 11)
- Jason's House (Pillar 5)
- Jason's House (Pillar 6)
- Jason's House (Pillar 8)
- Jason's House (Pillar 9)
- Jason's House (Power Pole)
- Jason's House (Rear Stairs)
- Jason's House (Roof)
- Jason's House (South Veranda)
- Jason's House (Upper Veranda)
- Jason's House (Window 3)
- Jason's House (Window 4)
- Jason's House (Window 5)
- Key Lento
- Lake Surprise Viaduct
- Marina Club at Blackwater Sound
- Naval Air Station Key West (Control Tower)
- Naval Air Station Key West (Radar Tower)
- New Bahia Honda Bridge
- Old Bahia Honda Bridge
- Old Bahia Honda Bridge (Barrier)
- Old Seven Mile Bridge
- Rocks (Grassrivers)
- SFUWO School
- Seven Mile Bridge
- Small Radio Tower (Key Lento)
- Sombrero Key Light
- Squalo Billboard
- Tree on Island K
- Trees B (Grassrivers)
- Trees C (Grassrivers)
- Trees D (Grassrivers)
- Trees E (Grassrivers)
- Unnamed Building #1 (Blimp Key)
- Vake Island
Grassrivers 33 places Grassrivers Region guide
- 1450 Brickell Ave
- Box in Backyard
- Brickell Arch
- Catalan Key Coastline
- Central District Wastewater Treatment Plant (Tank)
- Dirt Road (Grassrivers)
- Double Pole
- Floodgate
- Four Seasons Hotel Miami
- Hamlet Coastline
- Homestead Water Tower
- Infinity at Brickell
- Keys Bridge
- Lamp Post
- Large Grassrivers Bridge
- Magic City Casino (?)
- Office in the Grove
- One Broadway
- Park Grove Condominium
- Prison Tower
- Red Billboard (Hamlet)
- Rickenbacker Causeway Bridge
- Small Grassrivers Bridge
- Small Keys Bridge
- Stiltsville
- Tall Billboard
- Turkey Point Nuclear Power Station
- Two Tequesta Point
- Virginia Key
- Virginia Key Coastline
- WDNA FM
- Watson Bay
- White Billboard (Hamlet)
Port Gellhorn 22 places Port Gellhorn Region guide
- Bay
- Billboard (Hank's Waffles)
- East-West Highway
- Easy Hill
- Juice Fruit Sign
- New Foundation Church
- North Port Gellhorn Coast
- Oval Yellow Sign
- PGH Barrier Island
- PGH Canal
- PGH Island A
- PGH Island B
- PTCC (1)
- PTCC (2)
- PTCC (3)
- Port of Tampa Container Crane
- Pylon
- Radio Tower #1 (Port Gellhorn)
- Ship
- Train Signal (S)
- Uncle Jack's Valley
- Water Tower (West Port Gellhorn)
Ambrosia 69 places Ambrosia Region guide
- 1500 Sonora Ave (Silo)
- 1500 Sonora Ave (Tank)
- 1800 Club
- 22 Biscayne Bay
- 3001 Gordon Hwy (Water Tower)
- 3400 Transmitter Rd
- 419 NE 4th Ave
- Ambrosia Airfield
- BB Hill
- Big Cat Cage Roof
- Billboard (South Ambrosia)
- Building A (Ambrosia)
- Building B (Ambrosia)
- Building near Pool
- Canal A (Ambrosia)
- Canal B (Ambrosia)
- Canal C (Ambrosia)
- City View Parking Garage
- Conveyor near Pile
- Dark Billboard (Ambrosia)
- Elephant
- Factory A (Ambrosia)
- Factory D (Ambrosia)
- Gas Station (Leonard County)
- Industrial Building 1 (Ambrosia)
- Industrial Building 2 (Ambrosia)
- Lamppost near Starlet Motel
- Liquor Store
- Margaret Pace Park
- Marina (Stockyard)
- New Wave Condominiums
- Orlando Station
- Path A (Ambrosia)
- Path B (Ambrosia)
- Path C (Ambrosia)
- Path D (Ambrosia)
- Path E (Ambrosia)
- Path F (Ambrosia)
- Quantum on the Bay Condominium (N)
- Quantum on the Bay Condominium (S)
- Radio Tower (Ambrosia)
- Road (South Ambrosia)
- Road A (Ambrosia)
- Road B (Ambrosia)
- Road C (Ambrosia)
- Road D (Ambrosia)
- Road E (Ambrosia)
- Road F (Ambrosia)
- Route 35
- Sailboat Cay
- Sidewalk Creep
- Starlet Motel
- Starlet Motel Parassol 1
- Starlet Motel Parassol 2
- Starlet Motel Pool
- The Crimson
- Train Signal (Ambrosia)
- Train Tracks (Ambrosia)
- Trees near Wheelabrator
- US Sugar Mill (Factory)
- USSM Smokestack
- Uptown Lofts
- Warehouse 4 (Ambrosia)
- West Venetian Causeway Bridge
- Wheelabrator South Broward
- White Silos (E)
- White Silos (W)
- Wyman (Initial)
- Wyman (Pool)
Mount Kalaga National Park 36 places Mount Kalaga National Park Region guide
- 252 N Tyndall Pkwy
- 536 Richard Jackson Blvd
- Ambrosia Bridge
- Ambrosia Main St
- Ambrosia Road
- Beige Billboard
- Billboard with Diversity Motif
- Billboard with Irregular Shape
- Billboard with Oval Motif #1
- Black Bison
- Domed Hills Sign
- Escher Bridge
- Guard Booth (Ambrosia)
- Highway Bridge
- Hill Road
- Island LLA
- Island LLB
- Lake Leonida
- Lakeside Canal
- Large Billboard (Ambrosia)
- Mount Waffles
- Quarry
- Red Boxville
- Springfield Community Church
- Sunshine Skyway Bridge
- Tall Double Billboard
- Traffic Sign
- Train Tunnel
- Waffles Arrow
- Waffles Billboard
- Waffles Ridge
- Waffles Sign
- Water Tower (North Port Gellhorn)
- White Pole
- Worker A (Ambrosia)
- Worker B (Ambrosia)
Wider Leonida 2 places
Triangulated positions that fall outside the six published region groups.
- East Coast
- Light Pollution
Post-launch map layers
Every new pin has a written final approach and a cited retail-game source.
| Layer | Coverage | Best use |
|---|---|---|
| Featured secrets | Twenty-three focused stops covering weapons, quests, Easter eggs and fixed vehicles | A compact route through the most useful or unusual discoveries |
| Unique weapons | Seven plotted sites | Separate the nearby Permit Keys pistol and shotgun wrecks |
| WAiNK Curiosities | All 35 checklist entries | Track environmental scans across Leonida |
| More collectibles | 189 cards, magazines, book swaps, playlists, murals, WAiNK landmarks and sculptures | Search and filter the released game's mapped collections |
| Illegal operations | 40 verified hideouts | Find guarded properties and their valuables |
| Safes | 40 verified fixed locations | Locate loot containers; some codes remain local or randomized |
| Survey pins | Pre-launch official-footage triangulation | Historical comparison on the legacy base |
| Landmark research | Community real-world comparisons | Identify the Florida inspiration behind places |
The six published regions at a glance
Details directly visible in region-labelled screenshots.
| Region | Published details | What remains unknown |
|---|---|---|
| Vice City | Ocean Beach, Little Cuba, Tisha-Wocka flea market and VC Port are named | District boundaries and street plan |
| Leonida Keys | Tropical archipelago; beaches, bars and dangerous waters | Island names and exact extent |
| Grassrivers | Wetland waterways with mangroves, airboats and alligators | Settlement names and boundaries |
| Port Gellhorn | Former vacation destination with cheap motels and closed attractions | Scale and street plan |
| Ambrosia | Allied Crystal sugar refinery and a local biker gang are named | Town names and boundaries |
| Mount Kalaga National Park | Northern-border park with hunting, fishing and off-road trails | Exact extent and access points |
The official Leonida screenshot atlas
One official image for each named region. Open a card for the full guide to that place and every published screenshot of it.
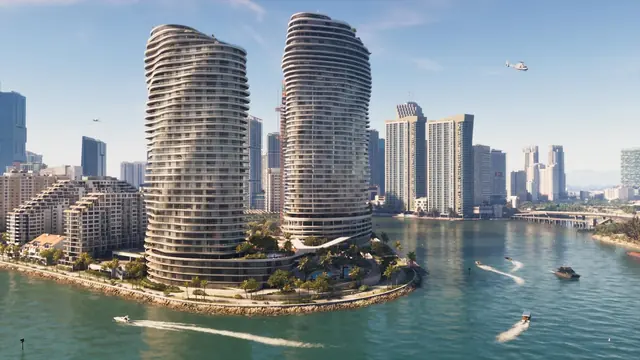
Rockstar names Ocean Beach, Little Cuba, Tisha-Wocka flea market and VC Port among the city's areas and destinations.
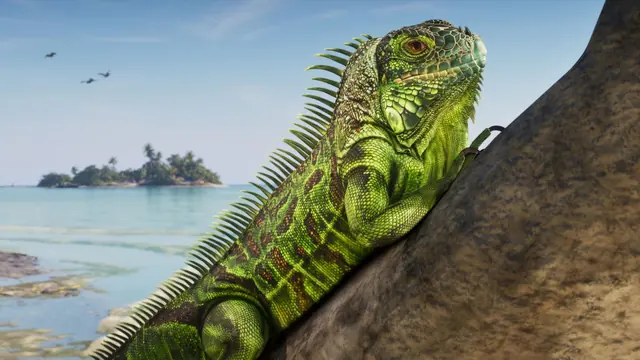
A tropical archipelago with bars, beaches and waters Rockstar characterises as both beautiful and dangerous.
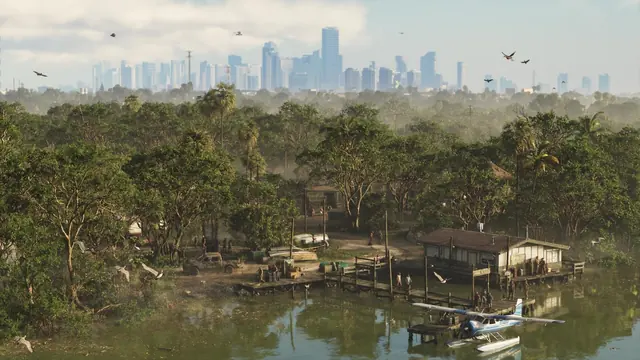
Leonida's wetland region: waterways, mangroves, airboats and alligators are visible in official material.
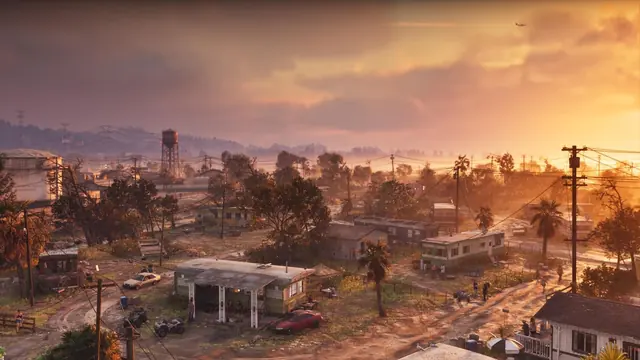
A former vacation destination now defined in Rockstar's copy by cheap motels, closed attractions and empty strip malls.
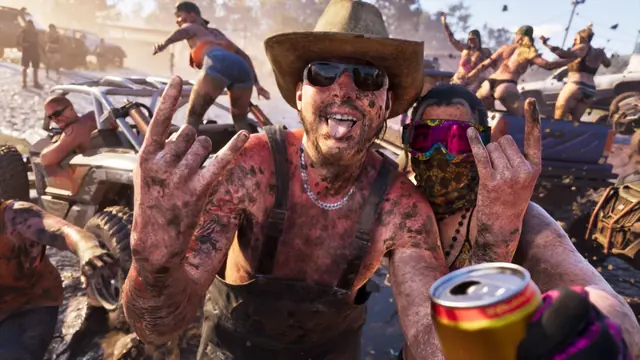
An inland industrial area where the Allied Crystal sugar refinery provides jobs and a local biker gang supplies much else.
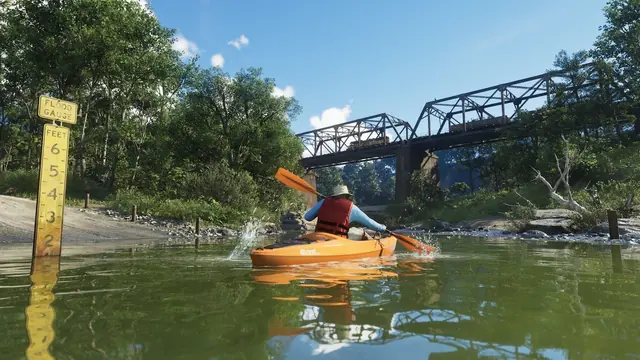
A national park on Leonida's northern border with hunting, fishing and off-road trails, surrounded by remote backwoods.
Vice City is the centre, not the whole
GTA VI is framed as a return to modern-day Vice City, and the marketing leans hard on that phrase. It is the most valuable piece of nostalgia in the series.
Read the framing carefully
Vice City is the heart of the map and is described as the most detailed city in the series. Our Vice City guide covers it in full.
It is not the edge of the world. Five other regions sit around it.
Why the trailers look Vice City heavy
Most footage so far is Vice City footage, because Vice City is the sell.
The other regions have had far less screen time. That is a marketing choice, not a statement about how much of the game happens there. Leonida Keys, Grassrivers and Mount Kalaga each have their own guide.
The map in numbers
The first three rows are now official. Area figures still are not.
| Figure | Number | Status |
|---|---|---|
| Named regions | 6 | Confirmed |
| Location screenshots published | 42 | Counted from the official library |
| Cities | 1 named | Vice City; others unnamed |
| Square miles | Unknown | Every figure circulating is an estimate |
| Official full map | 1 | Printable launch map |
How big is it, really?
Nobody outside the development team can answer that from published material.
Where the numbers you have seen come from
The precise figures circulating online come from community reconstruction projects. They are not an official map or a specification.
Those projects can be good analysis. They are not interchangeable with the six named regions, and we keep them out of the fact box. Our map size page handles the estimates and labels them as estimates.
What is not confirmed about the map
- Whether any region from a previous GTA game is accessible.
- The total number of enterable interiors.
- Whether the map expands post-launch, as GTA Online's did.
- Any road-level detail outside what official footage has shown.
- The exact scale figure - Every number in circulation is an estimate.
Everything in GTA 6 Interactive Map of Leonida: All Locations and Secrets
13 in-depth articles, each reviewed and dated. Confidence labels tell you how firm each one is.

GTA 6 Belville Simulation House Location
Find the house that was teased in San Andreas in 2021. Break into its garage and read the notes left by a man...

GTA 6 Literal Easter Egg Tower Guide
Climb the Bluegrass antenna mast, find the painted eggs at its summit and use the correct interaction to...

GTA 6 Genuine Cowboy Hat Location
Find the Orchard Avenue yard sale in southern Port Gellhorn and buy the $5 cowboy hat that closely resembles...

GTA 6 Hauners Ridgway Mini Tank Location
Follow José Bermúdez's Little Cuba clue trail, open the President's bunker and reach the IAA Black Site hangar...

GTA 6 Secret Locations Route
Run a practical 23-stop route from Jason's house and the golden KZ-59 to the Ridgway mini tank, tower egg,...

GTA 6 WAiNK Curiosities: All 35 Locations
A statewide, map-linked checklist for every Curiosity scan, from the Meerwunder wreck and C0-B8 debris to the...
Mount Kalaga National Park
Hunting, fishing and off-road trails on Leonida's northern border, with remote communities beyond the...

How Big Is the GTA 6 Map?
Every number you have read is an estimate. Here is where the estimate comes from, how confident you should be...
Ambrosia, Region Guide
Allied Crystal keeps the region working while a local biker gang supplies almost everything else. The confirmed...
GTA 6 Port Gellhorn Region Guide
A released-game guide to Port Gellhorn's streets, waterfront, activities and routes, with exact discoveries...
Grassrivers, Region Guide
Wetland, wildlife and almost no infrastructure. Grassrivers is the least populated region on the map and...
GTA 6 Leonida Keys Region Guide
A causeway chain over turquoise water, described by Rockstar as 'the gateway to paradise' - And, in the same...
Vice City in GTA 6: Region Guide
Rockstar calls it the most detailed city it has ever built. Here is what forty years of in-fiction time did to...
Frequently asked questions
Is there an official GTA 6 map?
Yes. A printable map of Leonida was published at launch. It shows the state and road network, while secret and collectible detail comes from verified player findings.
How many regions are in the GTA 6 map?
Six are confirmed: Vice City, Leonida Keys, Grassrivers, Port Gellhorn, Ambrosia and Mount Kalaga National Park.
Is the GTA 6 map bigger than GTA 5?
Comparable map dimensions have not been published. Community reconstructions suggest a larger world, but that is analysis rather than an official measurement.
Is Vice City the whole map?
No. Vice City is the largest urban area and the marketing centrepiece, but it is one of six regions in the state of Leonida.
What real place is Leonida based on?
Florida. Vice City corresponds to Miami, the Leonida Keys to the Florida Keys, Grassrivers to the Everglades, and Port Gellhorn to the Gulf-side Panhandle resort towns.
Can you swim and dive across the whole map?
Scuba diving is a confirmed activity and the Keys are built around water traversal, so open water is clearly navigable. The precise boundaries of the swimmable area have not been detailed.
Where is Jason's house in GTA 6?
Jason's Chapter 1 house is the waterfront stilt home on Peach Palm Dr in Key Lento. Approach from Calypso Ave and look for the basketball hoop beside its parking space.
How many WAiNK Curiosities are on the map?
All 35 Curiosities in the post-launch checklist are plotted, including the Derelict Spy Vessel in the Permit Keys.
0 comments
No comments yet. Sign in with Google to start it. Reading needs no account.